
Unclog Your BMW’s Sunroof Drains Before They Flood It
Short answer: A BMW sunroof drain leak almost never means your sunroof seal has failed. Your 3 Series sunroof is designed to let a little water in; four small drain tubes (one at each corner of the tray) carry water down the A- and C-pillars and out under the car. When debris plugs a tube, the tray overflows into the headliner, A-pillar trim, or footwells. Clearing them is easy DIY: feed a blunt nylon trimmer line or gentle low-pressure air through each drain, flush with water, and confirm flow exits under the car. Avoid high-pressure air — it can blow the press-fit hose off its fitting.
If your BMW 3 Series smells musty after rain, shows damp A-pillar trim, or has standing water in a footwell, the sunroof drains should top your suspect list. It’s one of the most common interior leaks across the E90, F30, and G20 — and the most misunderstood: most owners blame the glass seal, when the real culprit is usually a pencil-diameter tube plugged with leaves and grit.
This guide covers the full picture — reading symptoms and mapping them to the right drain, where the four drains live on each generation, how they clog, the safe way to clear them, the water test that proves the fix, and when the water comes from somewhere else entirely — drawn from BMW technical documentation and long-term 3 Series owner experience.
How a BMW Sunroof Is Supposed to Handle Rain
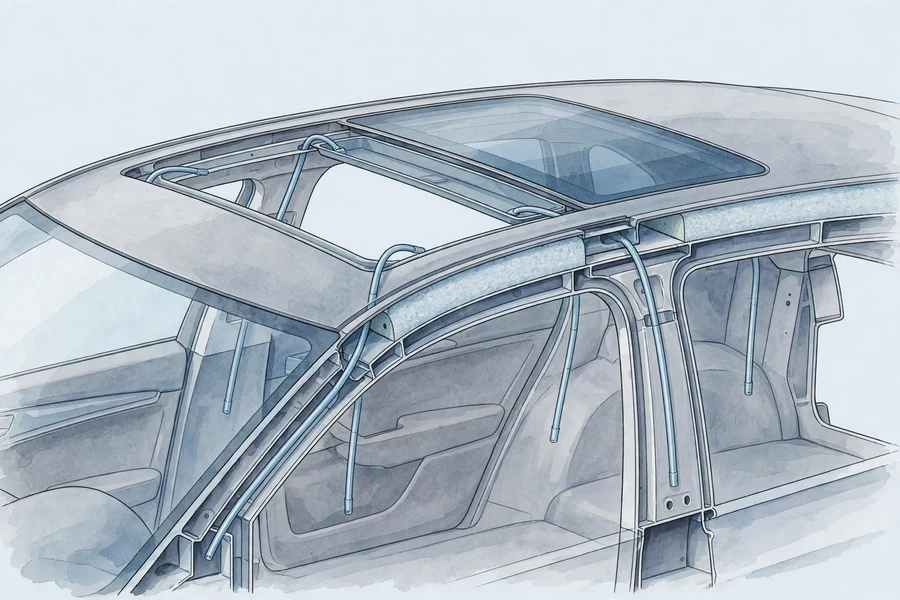
The rubber seal around your sunroof glass is not watertight — it’s a weatherstrip that deliberately lets a little water past. Under the glass sits a tray (the sunroof cassette) that catches it. Each corner of the tray has a small drain nipple with a flexible tube pressed on: the front pair routes down the A-pillars, the rear pair down the C-pillars, and water drips out under the car by gravity.
Four drains exist because a parked-on-a-slope tray pools water at the downhill corners. The system works until anything narrows a tube: leaves and needles washing into the tray, dried grit-and-pollen paste inside the tube, a pinched tube, or a tube slipping off its press-fit nipple. Any of those turns the tray into a bathtub, and the overflow goes wherever gravity takes it.
Symptoms: Reading Where the Water Enters
Interior water leaves no neat trail, but the dampness pattern tells you a lot: A-pillar or front-footwell water points at a front drain; soaked rear footwells or a damp C-pillar point at a rear drain. The table maps classic presentations to their most likely source — and to the lookalike causes.
| What you find | Most likely sunroof-drain cause | But first rule out |
|---|---|---|
| Damp A-pillar trim (side of windshield) | Front drain leaking inside the pillar, or disconnected at the tray | Windshield top-corner seal |
| Soaked front footwell, especially near the dead pedal | Front drain clogged — tray overflows and water runs down the A-pillar behind the trim | AC evaporator drain; door vapor barrier |
| Wet headliner edges near the sunroof | Tray backed up — water wicks into headliner fabric | Windshield or rear-window seal leak |
| Soaked rear footwell | Rear drain clogged — water runs down the C-pillar to the rear floor | Rear-door vapor barrier (very common lookalike) |
| Water in the trunk or spare-tire well | Rear drain leaking inside the trunk area | Taillight seals, trunk gasket, rear-window seal |
| Musty smell with no visible water | Chronic slow seepage saturating carpet padding | AC evaporator mold; trapped spilled liquid |
Two details separate drain leaks from lookalikes. First, drain leaks are rain-driven: they appear after rain or a wash, not randomly on dry days. A footwell that’s wet after a week of dry weather with the AC running isn’t the sunroof — that’s the AC evaporator drain. Second, drain water appears far from the sunroof: overflow from a front corner runs behind the A-pillar trim and emerges at the bottom, near the footwell, because the trim channels it downward. Expecting the puddle under the sunroof is how these leaks hide for months.
Headliner edges wick water surprisingly far from the overflow point, and stains are usually tan or brown rings from trapped dust. By the time staining appears, the leak has often been active a while — press the headliner gently around the sunroof opening and dome light; faint damp sponginess tells you more than stains do.
Where the 4 Drains Live: E90, F30, and G20
All three generations route the drains the same way — front pair down the A-pillars, rear pair down the C-pillars — but exit points and fittings differ. Front-exit locations are well documented on all three generations; G20 rear-exit details are thinner in public documentation, so this guide says “verify with the water test” wherever generation specifics aren’t firmly established.
| E90 (2006–2011) | F30 (2012–2018) | G20 (2019–present) | |
|---|---|---|---|
| Front drain inlets | Front corners of the tray, visible with glass open | Front corners of the tray, visible with the glass open | Front corners of the tray, visible with the glass open |
| Front tube routing | Down the A-pillars behind trim | Down the A-pillars behind trim | Down the A-pillars behind trim |
| Front exits | Behind the front splash shields, near the door jamb | Behind the front wheels near the door-hinge area — verify with the water test | Behind the front wheels — verify with the water test |
| Rear drain inlets | Rear corners of the tray — harder to see; use a flashlight | Rear tray corners, partly hidden by the mechanism | Rear corners of the tray, partially hidden by the mechanism |
| Rear tube routing | Through the C-pillars | Through the C-pillars | Through the C-pillars |
| Rear exits | Rear wheel-well area, behind the rear tires | Behind the rear tires | Behind the rear tires — verify with the water test |
| Notable quirks | Older cars may have brittle, short rear tubes | Press-fit hose joints with no clamp can pop off if disturbed | Few public teardown reports; assume the same layout until verified |
On the E90, expect age-related brittleness: a decade of heat cycling stiffens the tubes and can crack them where they pass through sheet metal. The F30 has the most documented drain work, and the recurring theme is the hose-to-nipple joint — a plain compression fit with no clamp that’s easy to knock loose with aggressive poking. One F31 owner’s repeatedly soaked dead pedal turned out to be exactly that: a hose pushed off its fitting, needing A-pillar trim, grab handle, and visor removed to reseat. On the G20 the layout matches, but public teardown reports are thin — treat exits as “behind the wheels, exact spot to verify” rather than fact.
Finding the inlets is easy: open the sunroof fully and look at the tray’s four corners. The front two are small, visible holes in the track area. The rear two sit near the rear corners, partly hidden by the mechanism — a flashlight helps. On older cars, a rear guide channel visibly full of water is itself a clog tell.
How the Drains Clog (or Fail Without Clogging)
The most common failure is the most boring: organic debris. Leaves, needles, and seed pods wash into the open tray, drift to the corners, and lodge in the drain nipples, while a paste of pollen and road dust dries into a narrowing coating inside the tube. Cars parked under trees get this first, and it’s seasonal — the first heavy autumn rain after a dry summer is the classic soaked-footwell discovery.
Pinched and kinked tubes are the second cause — sneakier, because the drain looks fine from the top. A tube can kink at a sheet-metal grommet or where trim presses against it; factory kinks are documented too (an F15 owner had a dealer run a new line under warranty). A partially kinked tube drains slowly: it keeps up in light rain but overflows in downpours, so the leak looks intermittent when it’s really flow-rate dependent.
The third failure is disconnection — and clearing methods can cause it. The tube-to-nipple joint at the tray is a simple press fit with no clamp. Aggressive poking or full shop air pressure can pop it, after which tray water pours directly inside the A-pillar or headliner, and the fix is trim removal to reseat the tube. F30-era mystery leaks after aggressive cleaning are often exactly this: the cleaning became the problem.
Freezing is a quiet fourth cause in cold climates: water sitting in a slow-draining tube freezes and can crack the tube or fitting, so the leak appears in spring, seemingly from nowhere. If your leak started in early spring after a winter parked outside, consider a cracked tube alongside clogs.
Leak Locator: Which Drain (or Something Else)?
BMW Sunroof Leak Locator
How to Clear the Drains: Step by Step
This is an easy-level DIY job — 30 to 45 minutes — with one strict rule: be gentle. The tubes and press-fit connections are delicate, and the number one way this goes wrong is a tool that’s too stiff or air that’s too strong. Clear all four corners, not just the suspect one — partial clogs elsewhere are common.
What you’ll need
- A few feet of round nylon lawn-trimmer line, cut end melted blunt so it can’t puncture the tube (the tool of choice — stiff enough for debris, soft enough for the hose)
- A small funnel or squeeze bottle
- A flashlight
- Warm water with a drop of dish soap
- A low-pressure air source if you have one — a bicycle pump or hand blower, NOT a full shop compressor
- Towels to protect the headliner and seats
Step 1 — Open the sunroof and inspect the tray
Slide the glass fully open and scoop debris from the tray corners — anything left will wash into the drains when you pour water. If one front guide channel holds standing water while the other is dry, you’ve already found a clogged corner.
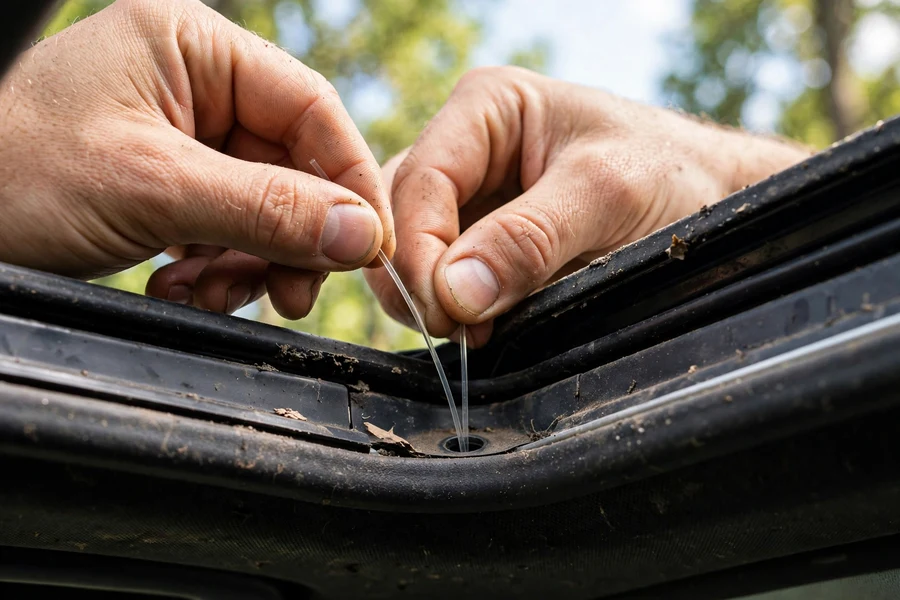
Step 2 — Feed trimmer line down each drain
Starting with the front drains, gently feed the blunt trimmer line into each drain hole, pushing slowly and twisting — work through debris, don’t spear it. The line stopping at tube bends is normal resistance; keep feeding until it won’t go further or emerges at the exit under the car. The rear holes sit about an inch in from each rear corner and need a flashlight plus patience on the longer path. If the line stops within inches on both a suspect drain and a known-good one, that’s likely just a bend — compare sides, don’t force it.
Step 3 — Flush with warm soapy water
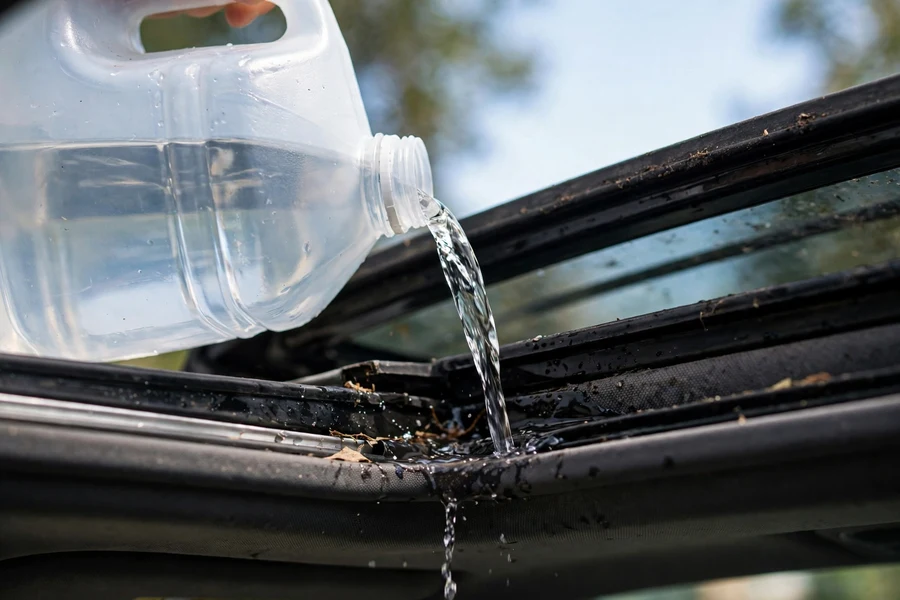
Pour a little warm, mildly soapy water into each tray corner with the funnel and watch: a clear drain swallows it promptly; water that sits or drains sluggishly needs more work. Alternate gentle prodding and flushing — a squeeze bottle pulsing water through loosens debris with no pressure risk.
Step 4 — Low-pressure air, from the bottom up if needed
If a corner still won’t flow, low-pressure air can help — but direction and pressure matter enormously. Safest is blowing UP into the tube from the exit under the car, pushing the clog back toward the tray. Blowing down from the top with full shop pressure is the classic mistake: it can pop the press-fit hose off the nipple, converting a clog into a headliner-removal job. Turn a compressor’s regulator to a gentle puff or skip air entirely — trimmer line plus water fixes the vast majority of clogs.
Step 5 — Clear the tray exits and check for kinked lines
With all four corners flowing, check the exit ends under the car — wheel-well debris can block the exits, and a damaged jack point can crush a nearby outlet shut. Confirm water exits where it should: water appearing somewhere odd (behind a rear side window, inside the trunk) means a tube is short, rerouted, or disconnected — clearing can’t fix that. A drain that clears then slows days later, or drains fast for seconds then stops, likely has a kink partway down; trace the tube behind the trim.
The caution that saves you a headliner removal
Worth restating: don’t force anything, don’t blast air. The hose joints are press-fit plastic, and owners have repeatedly disconnected them with enthusiastic poking or compressed air — the fix then requires removing A-pillar trim, grab handles, and visors to reseat the tube. Gentle trimmer line, melted blunt, patience, water: that combination fixes nearly every documented clog without collateral damage.
The Water Test: Prove All Four Drains Work
Never trust the job until you’ve water-tested it: park level, open the sunroof, and pour a cup of water into one tray corner at a time. For each, verify the tray empties promptly and water appears at the matching exit under the car — behind the front wheels for front drains, behind the rear wheels for rears. A corner that empties slowly still has a partial clog; one that exits somewhere strange has a routing problem.
Two refinements: park nose-downhill to stress-test the front drains, nose-uphill for the rears — and don’t be shy about volume. A full steady cup reveals marginal drains that keep up with a trickle but back up under load. Afterward, sit inside with a flashlight while water flows and check the A- and C-pillar trim for dampness — a disconnected tube shows as damp trim, not a blocked drain.
What It Costs: DIY vs. Shop
Clearing sunroof drains is firmly “try it yourself first”: the tools cost almost nothing and the risk is low if you respect the gentle-only rule. Pay a shop when a tube has popped off behind trim, when mold damage exceeds a quick cleanup, or when the leak persists after verified clearing — then you’re paying for diagnosis of something unusual.
| Approach | Typical cost (estimate) | Best for |
|---|---|---|
| DIY: trimmer line + funnel + water | $10–$25 in supplies | Standard clogs at any corner |
| Independent BMW shop: drain clearing | $80–$180 | If you’d rather not DIY, or a rear drain is hard to reach |
| Dealer: diagnostic + clearing | $200–$400 | Under-warranty cars; owners who want documentation |
| Trim removal + hose reseat (disconnected tube) | $400–$900 depending on trim depth | Wet A-pillar trim after clearing; confirmed popped fitting |
| Interior mold remediation detail | $150–$600 | Persistent musty smell, visible mold, or saturated carpet padding |
For broader cost context on keeping a 3 Series maintained, see the BMW 3 Series maintenance schedule — drain clearing is the kind of small preventive item that belongs on the same list as cabin filters and wiper blades, and it’s covered in the seasonal section below.
When It’s NOT the Sunroof Drains
Drains are the most common cause, not the only one. If you’ve cleared all four, water-tested them, and still get water, work through these impostors in order.
Door vapor barriers
The vapor barrier is a foam-and-adhesive membrane behind each door card. When its butyl seal fails — common after door work and with age — rainwater that normally drains through the door bottom instead leaks between the door card and frame and soaks the footwell by the door. This mimics a rear sunroof drain perfectly. The tell is the entry point: low, at the door side of the footwell, sometimes weeping from the panel’s bottom edge — versus sunroof water arriving higher via the C-pillar. Test it by pouring water on the closed window and watching for water between the panel and frame. Resealing is a door-card-off job; the procedure matches our BMW window regulator replacement guide, since the regulator sits behind the same panel.
AC evaporator drain
The AC evaporator’s condensate exits through a small drain under the car’s center; when it clogs with biofilm, condensate overflows into the front passenger footwell. The decisive difference: it happens in dry weather with the AC running, never from rain alone. A footwell wet after a week of sunshine isn’t the sunroof — stop looking there.
Windshield seal voids
A failed or badly installed windshield — especially a replacement — can leak at the top corners, producing damp A-pillar trim and headliner edges identical to a front-drain failure. Run a gentle hose stream along the windshield’s top edge and watch from inside; owners who chased drain leaks after a replacement frequently find a voided urethane seal at the top corner.
Rear-window, antenna, and taillight seals
For trunk or rear-parcel water: taillight seals are a notorious BMW entry point, the trunk-lid gasket can fail, and the roof antenna base gasket can let water in around the third brake light that travels down into the trunk. The definitive test is the garden-hose isolation method — one person sprays one area at a time outside while another watches from inside.
| If you see this | Check this instead of the drains | Quick test |
|---|---|---|
| Front footwell wet in dry weather | AC evaporator drain | Run AC on a dry day; check for drips under the car |
| Rear footwell wet, drains clear | Rear door vapor barrier | Pour water on the door window; watch the panel’s bottom edge |
| A-pillar wet after windshield replacement | Windshield urethane seal | Hose along the windshield top edge, watch from inside |
| Water in trunk/spare-tire well | Taillight seals, trunk gasket | Hose each area separately from outside |
| Drip at the third brake light | Roof antenna gasket | Hose the antenna base directly |
Mold and Mildew Aftermath: Drying It Properly
Clearing the drains stops new water, not what the old water left behind. BMW carpet padding is thick foam that holds an alarming amount of water after the surface feels dry, and that trapped moisture feeds the musty smell and eventual mold. Cleanup order: sun-dry the floor mats; pull up the carpet edges (trim and sill plates unclip) and feel the padding; if saturated, press towels in to wick water out, then run a fan into the footwell for a day or two — a small dehumidifier in the car is faster. Crack the windows if garaged.
For the musty smell, an enzyme-based interior cleaner or anti-microbial treatment on carpet and padding handles what drying can’t — the odor is microbial growth, and killing it matters as much as removing moisture. Visible mold on carpet backing or the headliner warrants a professional detail or remediation; surface wiping rarely reaches the padding. And take this seriously: prolonged front-footwell water can reach low-dash electronics and connectors — the BMW 3 Series fuse box diagram shows how much electrical hardware lives low in the cabin, which is why fast, complete drying isn’t cosmetic fussiness.
Keeping the Drains Clear
Twice a year, every spring and autumn: clear debris from the tray corners before it compacts, then pour a cup of water into each corner and confirm it exits under the car. Park under trees? Check more often in leaf season — pine needles fit the drain nipple diameter perfectly. Avoid weeks parked on a steep tilt in rainy season (two drains work overtime while the uphill ones crust over), and don’t blast the pressure washer into the seal channel — the volume can overwhelm even clear drains.
Preventive habits keep a 3 Series cheap to own long-term — drains are one of those small items, like cabin filters and wiper blades, that only get expensive when ignored for years. If you’re building your ownership routine, the BMW 3 Series complete guide covers the full picture from buying through maintenance.
Frequently Asked Questions
Where do the BMW 3 Series sunroof drains exit?
Front drains exit behind the front wheels near the door-hinge area; rear drains behind the rear wheels. G20 exits are less documented — pour water into each tray corner and watch for it at the matching exit.
Can I use compressed air to clear a sunroof drain?
Only at very low pressure, preferably blowing up from the exit end. Full shop pressure can pop the press-fit hose off its nipple, turning a simple clog into a trim-removal repair. Gentle trimmer line with a melted blunt end plus warm-water flushing is the safer method owners rely on.
Why is my front footwell wet but the sunroof drains are clear?
The common lookalikes are the AC evaporator drain (wet in dry weather with AC running) and a failed door vapor barrier (rain-driven, low at the door side). Also check the windshield top-corner seal after a replacement. Each has a quick specific test — faster than re-clearing the drains.
How much does it cost to fix a sunroof drain leak?
DIY clearing: $10–$25 in supplies. Independent shop: $80–$180; dealer diagnosis plus clearing: $200–$400. Reseating a popped tube behind trim: $400–$900. Interior mold remediation: $150–$600 if the carpet padding is saturated.
How often should I clean my BMW’s sunroof drains?
Twice a year — spring and autumn — plus after heavy leaf or pollen season if you park under trees. Each check takes five minutes: clear tray corners, pour a cup of water into each, and confirm prompt drainage. Prevention is far cheaper than drying a soaked interior.